TILT STEERING COLUMN INSTALLATION
1. Determine the floor mount you intend to use and dash board clamp or column drop. (See Flaming River Catalog or flamingriver.com)
2. Position the floor mount at the bottom of the steering column. Do not fully tighten the mount until the column is in its final position.
3. Install the column in the vehicle and install the dash clamp or column drop to hold the column in place. Next, re-adjust
floor mount to fit snug to the floor and make any final adjustments before tightening all the clamps.
4. Install the turn signal arm using the phillips screw provided. Then the tilt arm, and finally the hazard knob using the allen screw provided.
5. Connect the GM 4-1/4” male plug to your vehicle wiring harness.
NOTE: Ignition Rod must move free and clear to function.
Please make sure it is not binding in your column mount.
INSTALLING THE STEERING WHEEL
The spline on your new Flaming River steering column is a GM
spline designed from 69 to present steering wheels without an
airbag. The horn wire is furnished with your steering column and
is pre-installed into the canceling cam.
For More Tech Tips Visit
flamingriver.com
or call 1-800-648-8022
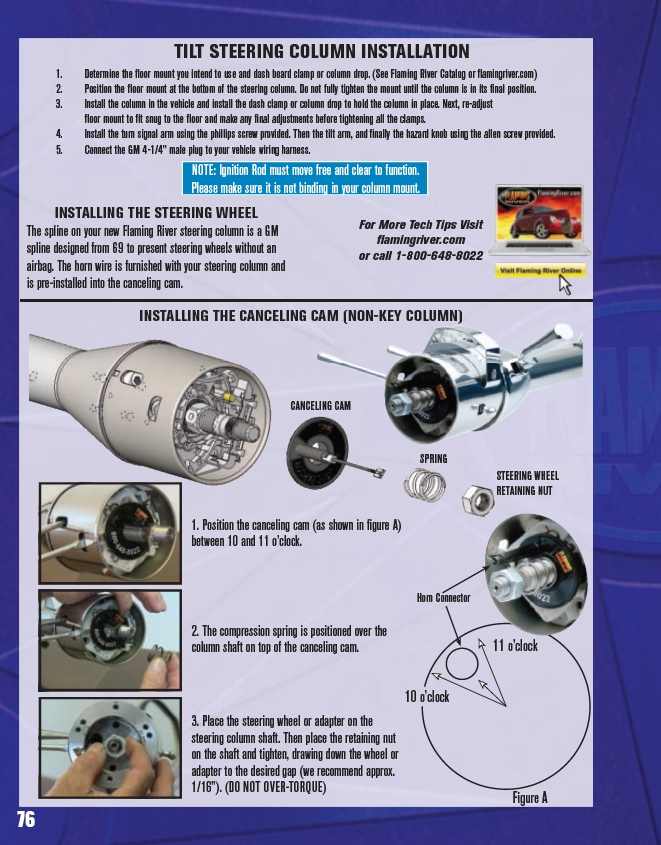
INSTALLING THE CANCELING CAM (NON-KEY COLUMN)
CANCELING CAM
SPRING
STEERING WHEEL
RETAINING NUT
1. Position the canceling cam (as shown in figure A)
between 10 and 11 o’clock.
2. The compression spring is positioned over the
column shaft on top of the canceling cam.
3. Place the steering wheel or adapter on the
steering column shaft. Then place the retaining nut
on the shaft and tighten, drawing down the wheel or
adapter to the desired gap (we recommend approx.
1/16”). (DO NOT OVER-TORQUE)
Figure A
10 o’clock
11 o’clock
Horn Connector
76